
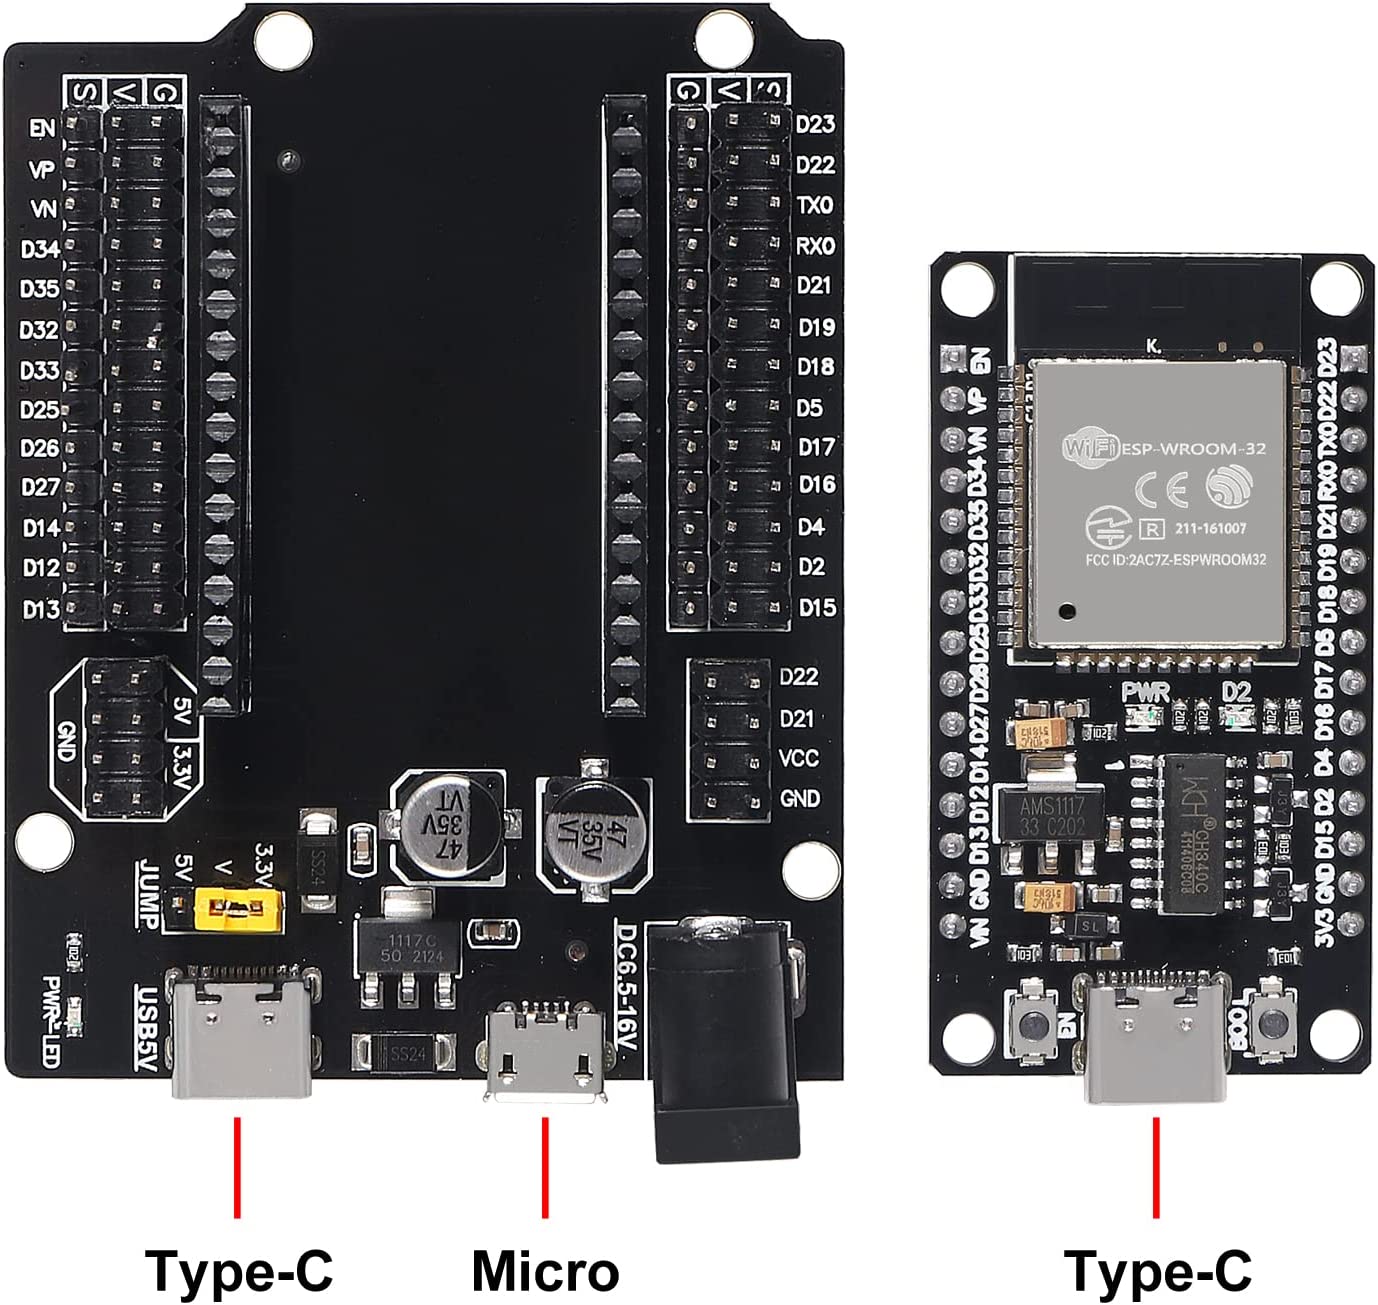
ESP32 Dev Board
- Details
- Category: ESP32
ESP32 Dev Board
Tutorials
Article Here
ESP32-WROOM-32 Download mode
EN - reset
Boot IO0
Hold Boot button, Press & release Reset button
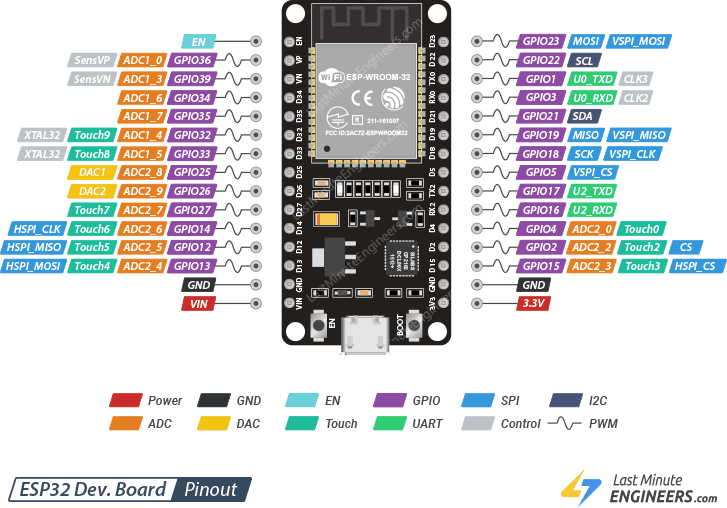
Analog to Digital Converter (ADC)
- ADC1_CH0 (GPIO 36) *
- ADC1_CH1 (GPIO 37)
- ADC1_CH2 (GPIO 38)
- ADC1_CH3 (GPIO 39) *
- ADC1_CH4 (GPIO 32) *
- ADC1_CH5 (GPIO 33) *
- ADC1_CH6 (GPIO 34) *
- ADC1_CH7 (GPIO 35) *
- ADC2_CH0 (GPIO 4)
- ADC2_CH1 (GPIO 0)
- ADC2_CH2 (GPIO 2)
- ADC2_CH3 (GPIO 15)
- ADC2_CH4 (GPIO 13)
- ADC2_CH5 (GPIO 12)
- ADC2_CH6 (GPIO 14)
- ADC2_CH7 (GPIO 27)
- ADC2_CH8 (GPIO 25)
- ADC2_CH9 (GPIO 26)
Analog Inputs (ADC)
Reading an analog value with the ESP32 means you can measure varying voltage levels between 0 V and 3.3 V.
The voltage measured is then assigned to a value between 0 and 4095, in which 0 V corresponds to 0, and 3.3 V corresponds to 4095. Any voltage between 0 V and 3.3 V will be given the corresponding value in between.
Even though ESP32 has 18 channels ADC, all the ADC pins are not available for the user. Of the 8 ADC1 channels, only 6 are available (ACD1_CH0 and ACD1_CH3 to ACD1_CH7) while ADC1_CH1 and ADC1_CH2 are not available (even the pins are not exposed in the ESP32 Development Board).
analogRead() Function
Reading an analog input with the ESP32 using the Arduino IDE is as simple as using the analogRead() function. It accepts as argument, the GPIO you want to read:
analogRead(GPIO);
These analog input pins have 12-bit resolution. This means that when you read an analog input, its range may vary from 0 to 4095.
ESP32 I2C Communication
Connecting an I2C device to an ESP32 is normally as simple as connecting GND to GND, SDA to SDA, SCL to SCL and a positive power supply to a peripheral, usually 3.3V (but it depends on the module you’re using).
| I2C Device | ESP32 |
| SDA | SDA (default is GPIO 21) |
| SCL | SCL (default is GPIO 22) |
| GND | GND |
| VCC | usually 3.3V or 5V |
SPI
For SPI communication you need four lines:
- MISO: Master In Slave Out
- MOSI: Master Out Slave In
- SCK: Serial Clock
- CS /SS: Chip Select (used to select the device when multiple peripherals are used on the same SPI bus)
Many ESP32 boards come with default SPI pins pre-assigned. The pin mapping for most boards is as follows:
| SPI | MOSI | MISO | SCLK | CS |
| VSPI | GPIO 23 | GPIO 19 | GPIO 18 | GPIO 5 |
| HSPI | GPIO 13 | GPIO 12 | GPIO 14 | GPIO 15 |
Oled
see here
|
OLED Display |
ESP32 (VSPI) | ESP32 (HSPI) | |
| GND |
GND |
GND |
|
|
VCC |
3.3V | 3.3V | |
| D0 (SCK) |
GPIO 18 (D18) |
GPIO 14 (D14) |
|
|
D1 (MOSI) |
GPIO 23 (D23) | GPIO 13 (D13) | |
| RES (any gen pin) |
GPIO 17 (TX2) (D17) |
GPIO 17 (TX2) (D17) |
|
|
DC (any gen pin) |
GPIO 16 (RX2) (D16) | GPIO 16 (RX2) (D16) | |
| CS |
GPIO 5 (D5) |
GPIO 15 (D15) |
|
ESP32 with Multiple SPI Devices
As we’ve seen previously, you can use two different SPI buses on the ESP32 and each bus can connect up to three different peripherals. This means that we can connect up to six SPI devices to the ESP32. If you need to use more, you can use an SPI multiplexer.
ESP32 WiFiMulti: Connect to the Strongest Wi-Fi Network (from a list of networks)
Raspberry Pi Headless Setup From a Downloaded Image
- Details
- Category: Raspberry Pi
First of all you you need to flash a copy of the Raspberry Pi OS (was Raspian) onto an SD card
For this guide on setting up a headless Raspberry Pi, we recommend that you use the Lite version of the operating system. The lite version of the OS does not come with the GUI, which is unneeded in a headless setup unless you are using remote desktop software.
Once you have written the Raspberry Pi OS to your SD Card, make sure you keep it connected to your device as we will need to add some additional files to it..
In the first section, we will show you how you can enable SSH without needing access to your Raspberry Pi’s interface.
We can do this by creating an empty file named ssh in the /boot folder of your SD Card.
Make sure when you create this file that you do not give it a file extension.
1. First, open the boot directory for your Raspberry Pi’s SD Card.
Within this SD card, create a file called “wpa_supplicant.conf” and begin editing it in your favorite text editor.
2. Within this file, we can enter the configuration details for our network.
Before we do this, you must first work out the 2 letter ISO 3166-1 country code.
As an example of a valid country code, the code for Australia is “AU“. For the United Kingdom, this code is “GB“, and for the United States, the country code is “US“.
In addition to the country code, you must also know the SSID and the password for the WiFi network you want to connect to.
3. Once you have the required information, go ahead and enter the following text into the file.
Make sure you fill in the correct information within this file. We have highlighted the sections that need you to fill in your information.
ctrl_interface=DIR=/var/run/wpa_supplicant GROUP=netdev
update_config=1
country=[WIFI COUNTRY CODE]

network={
 ssid="[NETWORK SSID]"
 psk="[NETWORK PASSWORD]"
}
4. The Raspberry Pi OS detects that this file exists within the boot directory.
Once it detects the file, it copies it from the boot drive to the correct location on the root file system. It then uses these settings to start up the wireless network connection.
You may be wondering how you connect to your Raspberry Pi now that you have connected it to your network and have SSH enabled.
There are two possible ways to do this. The first is to try connecting to the raspberrypi hostname. The other way is to retrieve your Pi’s IP address.
To connect to the Raspberry Pi using the hostname, you can use raspberrypi or raspberrypi.local within the IP field of Putty or MobaXTerm.
Using the hostname does not always work, so there are times where you will need to get the IP address of your Raspberry Pi.
Raspberry Pi Dependency And Setup Instructions For Pixhawk Communication
- Details
- Category: Drones
This guide will show you how to take a fresh install of raspbian (latest Buster and legacy Buster) and enable to work with the dronekit-python API to control the pixhawk vehicle from a python script (and without an RC controller).
The guide consists of dependency installs and raspberry pi config modifications.
This guide is applicable to any Pixhawk + Raspberry Pi setup, including those used on ArduRovers or ArduCopters, or even ArduPlanes. This will allow ANY ardupilot flight controller to communicate with ANY flavor of raspberry pi (4B, pi zero 2W etc).
Dependencies (BULLSEYE)
- sudo apt-get update
- sudo apt-get upgrade
- sudo apt-get install python3-pip python3-dev python3-opencv python3-numpy
- sudo apt-get install libxml2-dev libxslt-dev
- sudo pip install future
- sudo apt-get install git screen
- sudo pip install pyserial dronekit MAVProxy imutils
- git clone https://github.com/dronedojo/video2calibration
- git clone https://github.com/dronedojo/pidronescripts
Dependencies (BUSTER)
These dependency installs are only confirmed to work on a freshly installed version of Buster.
- sudo apt-get update
- sudo apt-get upgrade
- sudo apt-get install python-pip python-dev python-opencv python-numpy
- sudo pip install future
- sudo apt-get install git screen python-wxgtk4.0 python-lxml
- sudo pip install pyserial dronekit MAVProxy imutils
- git clone https://github.com/dronedojo/video2calibration
- git clone https://github.com/dronedojo/pidronescripts
Setup Instructions
Need to disable serial console to enable uart bridge between pixhawk and raspberry pi.
sudo raspi-config
Go to “Interface Options” then “Serial Port”
Would you like a login shell to be accessible over serial?
select NO
Would you like the serial port hardware to be enabled?
select YES
Exit raspi-config by selecting FINISH and REBOOT
sudo reboot
THEN:
Go to /boot/config with “sudo nano /boot/config.txt”
Go to [all] section
Enter:
enable_uart=1
dtoverlay=disable-bt
Then SAVE and REBOOT.
NOW you should be good to go to use the dronekit API to control the pixhawk over the UART bridge from the Raspberry Pi.
Setup Blender as millimeters
- Details
- Category: Blender
Scene Properties -> Unit System Metric -> Unit Scale 0.001 -> units mm
To bring the grid Viewport Overlay scale to 0.001